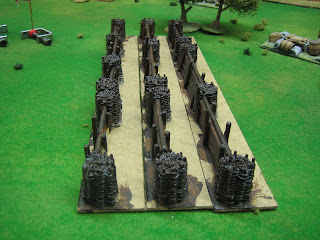
Anyway, I have taken a few shots of my 'generic earthworks' to show how I made them. They are easy to construct and they are also quite cheap - which puts them into the scope of most gamers.
Firstly, making 12" of earthwork seemed a bit silly. Earthworks are so quick and simple to construct that you might as well make a batch of pieces. I had 16 resin gabions in the locker, so I laid them out next to a tape measure and worked out the length of earthwork I could manufacture from them. It worked out at 36 inches (3 'long' sections).
This is a lot of earthwork for 16 gabions - but I cheat the cost.
After gluing the gabions back towards one edge (see pic above), singly and in pairs, to a strip of 2mm MDF (35mm wide), I cheat the cost by gluing a piece of card in the space between the gabions.
Note: The wide side of the MDF strip will be the front of the earthwork and the narrow side will be the back (defender's) side.
Note: Each strip starts and ends with a gabion. They make the section joins 'disappear'.
To the back (defender's) side of the card I stick horizontally laid lengths of wooded barbecue skewers. (I cut the skewer to length with wire snips). Then I add some vertical 'holding posts'. This is where the cost savings are made - wooden skewers and card are as cheap as chips and look perfectly acceptable as 'barricade' when finished.
At this point I undercoated everything with dark brown artists acrylic.
Next I added the 'earth' to the front of the breastwork. For this I used terracotta Daz modelling clay. It air drys, doesn't shrink much (hardly at all), is strong and durable when set, and is cheap - I used half a 500g pack that I picked up, from ebay, for £3 including postage for this job.
Once dry I used PVA to texture the clay with sand and grit.
 Then I painted the lot with acrylics, acrylic ink, and household emulsions. I added a few patches of flock for more texture and colour - Bob's your uncle, 3 foot of generic 16th to mid 19th Century earthworks.
There is another difference between old and new that will not be immediately apparent. The basing uses a different material - the old basing is perspex from an old shower screen, alas, now all used up. Old shower screen, now, those were the days......


