A few more counters for Fleet of Battle


This, I think, will be the last of the counters. You should have enough to game almost everything here. For liburnae I would use either pentekonter or bireme counters as these are 'out of date' by the time that liburnae come into use (I think?). Please feel free to copy into MS paint (or similar) and modify anything you like - take or add towers, new colours for allied fleets, completely re-design for use with other rule sets, etc.

Hochkirch - The Re-fight. Part 1.


Turn One & Two.
The Prussians were rousing themselves from their encampments whilst Austrian howitzer shells, fired blindly into the darkness, exploded all around. But where were the Austrians? [Turn 1 ended on an immediate tied d20 initiative roll - it seemed the Austrians were waiting for more of their flank columns to get into position before beginning the attack. I love Piquet - a surprise every time).

At the first spark of light they emerged from the early morning mist rushing Hochkirch with Grenzers. They met with mixed results. On the right they were counterattacked by Prussians around the church - it was madness and folly - the Prussians were butchered by these shrieking Balkan peasants. On the left, a sharp volley from the Prussian grenadiers and blasts of canister stopped them in their tracks. Elsewhere the Prussians were at a loss as to where the next attack would fall; but most tried to make their way towards Hochkirch. The first Austrian flanking columns arrived (#1 & 2). The Prussians in the north broke camp and assembled into march column to march south west, and then, with the battle for Hochkirch in full swing, it was turn three (another early tied d20 roll).


Turn Three and Four
No sooner had the Prussians in the north sector of the field started their march, the Austrians began to arrive en-masse on their sector (columns 4, 5, 6 followed by the last and most tardy #3) Arenberg's infantry deployed out of column of battalions into line of battalions (the first move arrival method worked even better than I had imagined - perfect!).

In the south the action around Hochkirch was fierce. The Prussian's hastily organised counter attack to retake the area around the church was coming under murderous fire from the Grenz, whose officers had finally managed to rally them (they had failed to find cards to advance through the village in turn 2 and 3) following their victory over its defenders and move on to the northern side of Hochkirch. In the western sector of Hochkirch the Prussian grenadiers and guns were holding their own - culling the Austrians facing them in their droves - but failing to completely remove the threat (no matter how many the Prussians killed they could not get them to fail morale challenges - the Austrians were aided by having drawn an Up1 to infantry morale in their morale card draw). But then, woe worth the day, Keith fell; the Austrian grenadiers rushed the guns and took the ground for which they fought gallantly to the last. Kieth's counter attack was on the point of collapse.

To the west there was inactivity. The Austrians were keen to await events around Hochkirch whilst Zieten's cavalry awaited firm orders (the Prussian could not draw a cavalry move card if their life depended on it - and it did).

Back in the north the Prussian grenadiers and guns retook their former position and awaited their flanking / supporting cavalry to be recalled. They were too late. Buccow's cavalry had made its way onto their northern flank and charged before any meaningful response could be made. The Austrian cavalry made a series of charges, down the grenadiers flank, rolling them up one by one. But then, miracle of miracles, the final units of grenadiers managed to hold; they drove off the Austrian cavalry with very heavy losses - Buccow's force was spent, and the Prussians sent helter-skelter to the rear rallied and retook their former positions.

Turn five.
Around Hochkirch the battle raged on. Here the Austrian grenadiers tried to dislodge their counterparts, in the western sector of Hochkirch, but were driven off in disorder and taken in the flank by Zietens cuirassier which now stood ready to countercharge any further Austrians daring to cross the earthworks.
Just to the east of Hochkirch the Prussians were now massing a new attack to retake the church area.

In the north, the Prussians cavalry had now managed to take up an advantageous position from which it could try and make an enveloping move of its own.

So we leave the first part of the story with five and a half turns left to go and the Prussians holding on by their fingernails. Having not taken the option to withdraw the Prussians only have one hope left - to attack in the north and, with what remains of that force, march south to the relief of Hochkirch, they have 1 morale point remaining - the Austrians have 27. For the Prussians it's time to do, die and keep going.


Fleet of Battle - Key tables and designer notes


FLEET OF BATTLE
Designer Notes

Firstly let me start by saying that you will probably need to have a copy of Field of Battle, or at least have played FoB before, to get the basics of these rules. I have no intention of writing explanations for every card and table because having played FoB it all makes perfect sense to me – plus you really should buy a copy. Having said that, Fleet of Battle is somewhat different in several ways and these differences will be immediately apparent to those with experience of FoB. All changes are detailed in the relevant tables – you just have to fill in the gaps.

I have tried to keep the basic simplicity of galley warfare to the fore throughout the rules: Manoeuvre followed by ramming or boarding.

Because the rules are for fleets numbering tens of ships, rather than a mere handful, several aspects of Field of Battle have been simplified to a large extent to speed play, cut down on record keeping and to concentrate on the key decision making of the players.

One of the key differences is the decision not to adopt the variable defence die. It was found, during early play testing, that this involved too much reference to roster sheets and ‘dicing up’. It was simpler to go for a basic defence die adjusted by target class on the combat tables. This was due to the speed that vessels came to grips with their opponents and the number of multi-combats that take place; this is down to the nature of warfare at sea; a lack of impeding terrain and the narrow frontage of ships. Ancient naval warfare is all about confused collisions and close action – it is wholly dissimilar to linear land action.

The game works best with at least 15 ships per side; optimally with 24 or more per side. I suggest that fleets should be divided into three to six Squadrons, each with its own flagship. Squadrons should be strong; if they have less than five ships each they will lack staying power. All training levels should be the same within a squadron; you may wish to give individual ships different training levels and of course there is nothing stopping you from doing so, but due to the overall complexity of ancient naval battles I advise against it. When working out ship numbers to re-fight historical battles I nominally use a model to ship ratio of 1: 10; historical actions were often very large indeed, they were armies afloat, veritable Armadas, involving fleets of up to 600 ships each.

Because of the number of units I have omitted ship morale rules in all but the most basic sense. Morale is represented on each ship by the number of Crew Integrity – as it drops the capability of the ship drops and on reaching 0 it will surrender or flee. When a squadron (command group) falls below 50% strength (in ships not fleeing, surrendered or sunk) its vessels are subject to fleet morale tests; ships in depleted squadrons are likely to quit the battle zone at a moments notice.

Fleet of Battle is a very bloody game. Sinking ships is quite easy – as it should be in the age of the ram. Making ramming too difficult to achieve or ineffective would create a game of ‘iron clads’ which ships of this period were not (the advice of Donald Featherstone, in his book Naval Wargaming, was taken without hesitation). It has been estimated that a quinquireme could hole another, even at oblique angles, whilst moving at less than 3 knots. A modern reconstruction of a light trireme, in sea trials, was capable of over 10 knots (with a fresh crew) and capable of cruising at 7 knots for long periods.

Boarding actions are usually over quickly. The reason why the size of both vessels is taken into account in the Boarding Action table is due to the expediential rise in the numbers of marines as vessels get larger; it was done to keep the boarding die range within manageable limits: d12 + 8 seemed a little pointless, not to mention overwhelming, especially when, occasionally, Vs d4.

Missilery is included but has been kept fairly ineffective on purpose. This is down to play-testing. We fought one battle with more complex and effective missilery rules – it was like the 7YW! Not ancient naval at all. Note that the Up 1 Vs Aphract ships in the missilery table refers to ships like triremes; Aphract is the opposite of Cataphract and means unenclosed / open.

I have tried to do away with as much record keeping as possible by keeping all vessels, when at full strength, at 4 Hull Integrity and 4 Crew Integrity. The difference in the size and power of each ship has been taken care of in its basic statistics and use of up and downs on the combat tables. Indeed, the inherent problems of record keeping are one of the primary reasons why naval wargaming is often neglected – no one likes doing paperwork or referring to endless reams of damage record sheets every time there is a move or combat to resolve. We have found that pins in the vessel’s base over which coloured beads can be placed is the easiest way of following damage. My own bases have four pins, one at the front and three at the back. The one at the front is used for squadron ID, flag ship marker. Those at the back are used for HI, CI and Hole, Surrendered and Flee markers. Apart from a squadron roster, with the number of ships originally in the squadron, ID bead colour, the leadership die and levels of crew training, no other paperwork is required – and this should usually be made out before the action starts to save even more time for actually playing.

One question I keep coming back to is why didn’t I go for three ship units capable of different formations with different abilities? It did cross my mind and I even went so far as paper exercises; but the answer is that, although very little is known about ancient naval warfare – so I could do what ever I liked, it all seemed a little too artificial and un-naval; at sea an action can turn because of one little ship performing miracles! But perhaps in the future I’ll change my mind.

Have fun,

James Roach


Fleet of Battle Ship Counters


I recently added my Fleet of Battle rules to the files sections of various Yahoo Groups (piquet, war galley and ancmed.) I use 1: 600 models by Xyston, but I remember that back in the halcion days of school libraries, Donald Featherstone's book Naval Wargames and lack of pocket money, I made do with cardboard counters with drawings (by hand) of triremes and the like on them. Now in these modern days and computers and home printing much nicer counters can be fashioned very quickly. So for those of you that are short of pocket money - here are some I made earlier (so to speak). I'm not sure why the trireme picture is much smaller than the trimiola because they were done using the same template; perhaps they are the same size when you click on them - we will see; but if they are not you can resize them (where required, I copy into MS Word, double click on the image, click on 'size' and change).
Later this week I will try and put the rules on this blog. The problem is not being able to do tables, so I might have to paste them into into paint and load them as 'images'. I also hope to increase the range of counters: Over 30 years after my first attempts they are still fun to design - with PCs in almost every home the kids of today don't know they're born!

Hochkirch 14 October 1758 (2nd edition)


The beauty of Piquet is that it can be tailored to fit any scenario using the basic tool box of its mechanisms. To demonstrate this I have chosen to do Hochkirch, which is quite a complex battle, as a scenario. I have added some flavoursome cards to the Prussian deck, allowed for some 'what ifs' and given some latitude to Austrian arrival moves in an attempt to make the battle flow more easily and entertainingly.

The game was set up using Duffy's books (The army of Frederick the Great and The Army of Maria Therasa) as a guide; Sam Coull's book Nothing But My Sword was also useful for flavour. I received help from the Yahoo SYW Group regarding the composition of Wurtemberg's command(thanks guys). I have scaled one tabletop unit to equal two of Duffy's 'map' units; this has led to some 'rounding' of numbers and types, but the ratios between the sides are about right. I have also, due to tabletop restrictions, moved some units. This is especially true of the Prussian hussars originally positioned south west of Hochkirch - I have retreated them closer to Hochkirch.

Fought as a straight fight Hochkirch is a decidedly uneven contest. Consequently, the Prussian victory conditions can change during the game to allow a historical defeat to become a tabletop victory - like a war gamer's 'Dunkirk' if you will (see Umpire And Other Notes).

HISTORICAL BACKGROUND

Following the Battle of Zorndorf on 25 August 1758 Frederick marched, with 6000 troops, back into the ‘Austrian’ theatre. Here he concentrated his forces with those of Brandenburg- Schwedt. His intention, with an army now totalling somewhat over 30,000 men, was to manoeuvre an Austrian army under Daun out of south-east Saxony. Daun was not for moving and settled down to hold Frederick where he was. After five weeks of inactivity Frederick sought to break contact and cut off Daun’s lines of communication with Bohemia. The move was not carried out with Frederick’s usual vigour; he halted at Hochkirch to await supplies; confident that he would be unmolested. Daun arrived at Hochkirch on the 13 October and set up camp beyond woodlandbarely 600 yards from the Prussian’s left flank.

PRUSSIAN BRIEFING.

You [Frederick] are accustomed to sticking close to the enemy and have been unperturbed by the presence of Daun’s army so close to your lines. Although Daun outnumbers you by a significant margin you were confident that he would not attack; and if he did, your army, comprised mainly of Brandenburgers and Pomeranians, and being largely untouched by the harrowing experience of Zorndorf, would be more than a match for Daun's soldiers in quality.

However, at 5am, you were informed of skirmishing between pickets in the woods beyond the right flank of your army. At first you thought this was just enthusiastic activity from the enemy’s Croats and ordered your troops back to their tents. Howitzer shells flying over the village of Hochkirch into your centre have caused you to re-evaluate the situation. A full blown attack is now in progress and falling on the extreme right of your position - at the village of Hochkirch. It is 5.30am and it will not be light for another hour.

Victory conditions
Hold Hochkirch until turn 10. Whilst you have any troops in or in contact with a Hochkirch town section you receive a bonus of 10 morale chips to your morale chip total.

Morale Cards (see below): 1 Stratagem Card, 1 Fanatic Action card, 1 I've Gone Mad! card, 8 other cards.

Stratagem: You have a column of troops under Wurttemberg some distance away to the north-west. It may march to the sound of the guns. On every appearance of the Stratagem Card, after turn 1, you may dice for Wurttemberg’s arrival – 1 chance in 6. If you send for Wurttemberg (costs 5 morale chips) it will arrive 1 chance in 3. On arrival card the units may make a single move of up to 36" onto the table measured from the table edge. Each unit may make a single wheel of up to 45 degrees at the start and end of the move. If, at any time during the move, the unit comes within 18" of an enemy unit or contacts a type II / III terrain feature it must cease movement at that point. The move must be in a straight line and no unit may voluntarily move out of command distance.
Fanatic Action card: You may declare one unit as Heroic. The unit will ignore push back and rout results. It will fight to the death. Once a unit is designated as Heroic the card is removed from the sequence deck.
I've Gone Mad! card: On the first appearance of this card you must declare one officer to be Heroic. He will be Up 2 for all officer checks and melees involving units to which he is physically attached. Furthermore, a unit to which he is attached may use the Fanatic Action card as a ‘wild’ card as per ‘Brilliant Leader’. However, he must roll d10 for survival checks on each and every officer check card.
Officer Quality: As standard except that Frederick must be Skilled or better.
Troop Quality: All Prussians adjust their quality rolls by +1 above standard.

AUSTRIAN BRIEFING

You [Daun] plan to rid the Empire of Frederick once and for all with an audacious plan of attack (if he thought Leuthen was clever!). Your plan comprises a six pronged attack (see deployment map) which will surround and annihilate the Prussian army.

The enemy is deployed in a line extending north to south facing east. Your main attacks will fall at the southern most part of his line at Hochkirch an hour before dawn. Your aim is to draw the Prussians here whilst four further columns envelop this position (see arrivals) from the east, the west and the north. Yesterday you prepared the way by clearing passages for your artillery through the woods to the south of Frederick's position and he did not move - you presume he thought you were preparing defences. You have, now, under cover of darkness, set your plan in motion.

Following a sharp skirmish with Prussian sentries your troops are about to launch the first attack. It is 5.30am. Hochkirch, that King and victory lie before you!

Victory Conditions
You must destroy or rout at least 12 Prussian units. To aid you in this, you may force a D12 tactical morale challenge versus any enemy units within 24" of Hochkirch or Rodewitz on the appearance of the Prussian major morale card if either is in your uncontested possession.

Morale Cards (see below): 6 off table arrival cards, 9 morale cards.

Column arrivals: Each of the enveloping columns arrives on table from turn 1 as detailed below:
On turn one the off table arrival cards for #1 and #2 are added to the sequence deck.
On turn two the off table arrival cards for #3 and #4 are added to the sequence deck.
On turn three the off table arrival cards for #5 and #6 are added to the sequence deck.

On the appearance each arrival card the units of the designated column may make a single move of up to 36" onto the table measured from the table edge. Each unit may make a single wheel of up to 45 degrees at the start and end of the move. If, at any time during the move, the unit comes within 18" of an enemy unit or contacts a type II / III terrain feature it must cease movement at that point. The move must be in a straight line and no unit may voluntarily move out of command distance.

Officer Quality: As standard.
Troop Quality: As standard. One Austrian battery in the main column may be howitzers. Howitzers ignore cover modifications for woods and villages.
UMPIRE AND OTHER NOTES
Alternative Prussian Victory Conditions: As a straight fight this game is almost impossible for the Prussian player to win. Consequently, as soon as either of the northern enveloping columns appear on table, a Panic card should be randomly added to the Prussian player’s remaining sequence deck. On its appearance the following note should be handed to the Prussian C-in-C:

“You are surrounded by superior numbers. There is now no dishonour in retreat. You can choose to change your victory conditions to WITHDRAW. If this option is taken: Count the number of units in your army not currently in rout. To win you must extricate at least half of these units off the table via grid square A1. (Note: To aid you in this option, all Prussian officers may supersede command to bring ‘out of command’ units into their sphere of influence to speed movement).

Visibility: For the first turn all shooting will be subject to a Down 2 modifier. All melee dice will be adjusted Up 1. All officer checks will be subject to a Down 1 modifier.

Grand tactical movement cards: Any unit that is in type I terrain and starting more than 18" from an enemy unit may also move on Native Mobilty cards. If in march column the unit may also move on Move in Difficult Terrain cards. Any such movement must cease 12" from any enemy unit.

Jersey. Some military bits and pieces.


Napoleonic artillery tower.

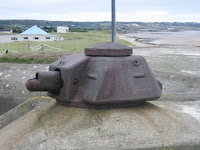
Jersey is one of the Channel Islands which are situated closer to France than England. Guarding the western approaches to the English channel they have always been of military importance. They have been occupied by, on occasion, the French (Napoleonic) and Germans (WWII).

Elizabeth Castle at St. Helier. Built in the late 16C. At low tide you can walk to it, at high tide you have to swim or take the amphibious bus (Puddle Duck). There is, daily, a recounting of the Napoleonic 'Battle of Jersey' by a suitably dressed presenter (this was a skirmish in the main square of St. Helier). Very much an audience participation event, including 'drill', which also includes a demonstration on bayonet practices, musket shooting and the firing of a cannon at 1p.m. (?) - to tell the French the island is still ready for them. It has a small military museum with exhibits from the Napoleonic Wars to WWII.


Mont Orgueil Castle (more often called Gorey Castle) was the main castle on the island until Elizabeth Castle was built during the reign of (you guessed it) Elizabeth I. It is sited on top of a high mound (it looks like it is perched on top of a volcano). I'm afraid my distance shots did not come out, but it looks very imposing in a medieval kind of way; it is a very steep climb to the top. For a medieval castle it is in excellent condition. It includes the later addition of a 16C gun tower (built to defend against opposing artillery which could be sited on an overlooking hill), a very nice shooting gallery (North East Passage) as well as some truly awful German WWII additions. They also provide free (to wear on site) helmets, shields and swords for kids (see my son demonstrating the 'double parry' defence).


The Channel Islands Military Museum at St. Ouen's Bay is a small one. It is situated inside a WWII German coastal defence bunker. It is worth a short visit; and is a great place to pick up a holiday souvenir (I got my vintage 20mm Flak 38 shell cases here - £14 the pair).


The maritime museum also has a few exhibits. A U-Boat gun and various other odds and sods, including the mast (or what is left of it) of a US torpedo boat that bit off more than it could chew.


I failed to get to the 'Jersey War Tunnels'; the main WWII museum on the Island. I had to make choices in what was only a five day family holiday! Next time.
 

Search This Blog

Popular Posts

Blog Archive