The Strategic Positions
Following the release for ransom of Bohemond of Antioch in 1103 AD the northern Franks celebrated by launching two offensives. The first was against the region around Alleppo from which they extracted tribute to pay back loans made for Bohemond’s ransom. The second was against the Byzantines who were trying to reclaim the Cilician territories to the northwest.
In the spring 1104 the northern Franks felt secure enough to turn against the Moslem states to the east. Their strategic goal was to take the mighty fortress of Harran. If this could be taken it would cut communications between the Moslems of Syria and the Moslems of Iraq and Persia. In March they began to raid Harran, and it became clear to the surrounding Moslem states that it was only a matter of time before the Franks besieged the place.
1103 AD had been a time of division for the Moslem world. The Seljuk Sultan Barkiyarok and his brother Mohammed had been at war. Peace was made between them by the division of territory in January 1104 AD; but it was an uneasy arrangement that suited no one. Following the death of Kerbogha of Mosul, Soqman the Ortoqid prince of Mardin had failed to gain the succession (he had backed the wrong horse in the civil war) and was at war with its newly appointed Seljuk atabeg Jekermish.
Harran, independent of Mardin and Mosul, was in a state of turmoil following a successful uprising against its general called Qaraj. His successor Mohammed of Isfahan was murdered by a servant called Jawali; a former page of Qaraj with whom Mohammed had become unwisely intimate. Jawali’s succession was weak and he was incapable of governing and protecting Harran effectively. When Frankish raids against Harran’s fields and trade routes began in the spring of 1104 AD he was in no position to counter them.
Harran was vital to the security to both Mardin and Mosul; Soqman of Mardin and Jekermish of Mosul quickly made peace and, patching up their differences, launched a counter offensive against Edessa to save it.
Hearing news that the Moslems were massing 70 miles from his capital, Baldwin of Edessa sent for help to his lieutenant Joscelin of Turbessel and Bohemond of Antioch. They would beat the Moslems to the punch by marching on Harran immediately. The armies concentrated before Harran and had they stormed the place immediately it would have fallen easily. But the Franks wanted the place intact and they quarrelled over whose flag would fly above its walls once it had been taken. Before the argument had been settled the combined armies of Soqman and Jekermish had swung south and were upon them; this move forced the siege to be broken. The battle that followed would take place across the river Balikh (the exact location of the battle is unknown, but it is certain that it took place some distance from Harran itself).

The Battle
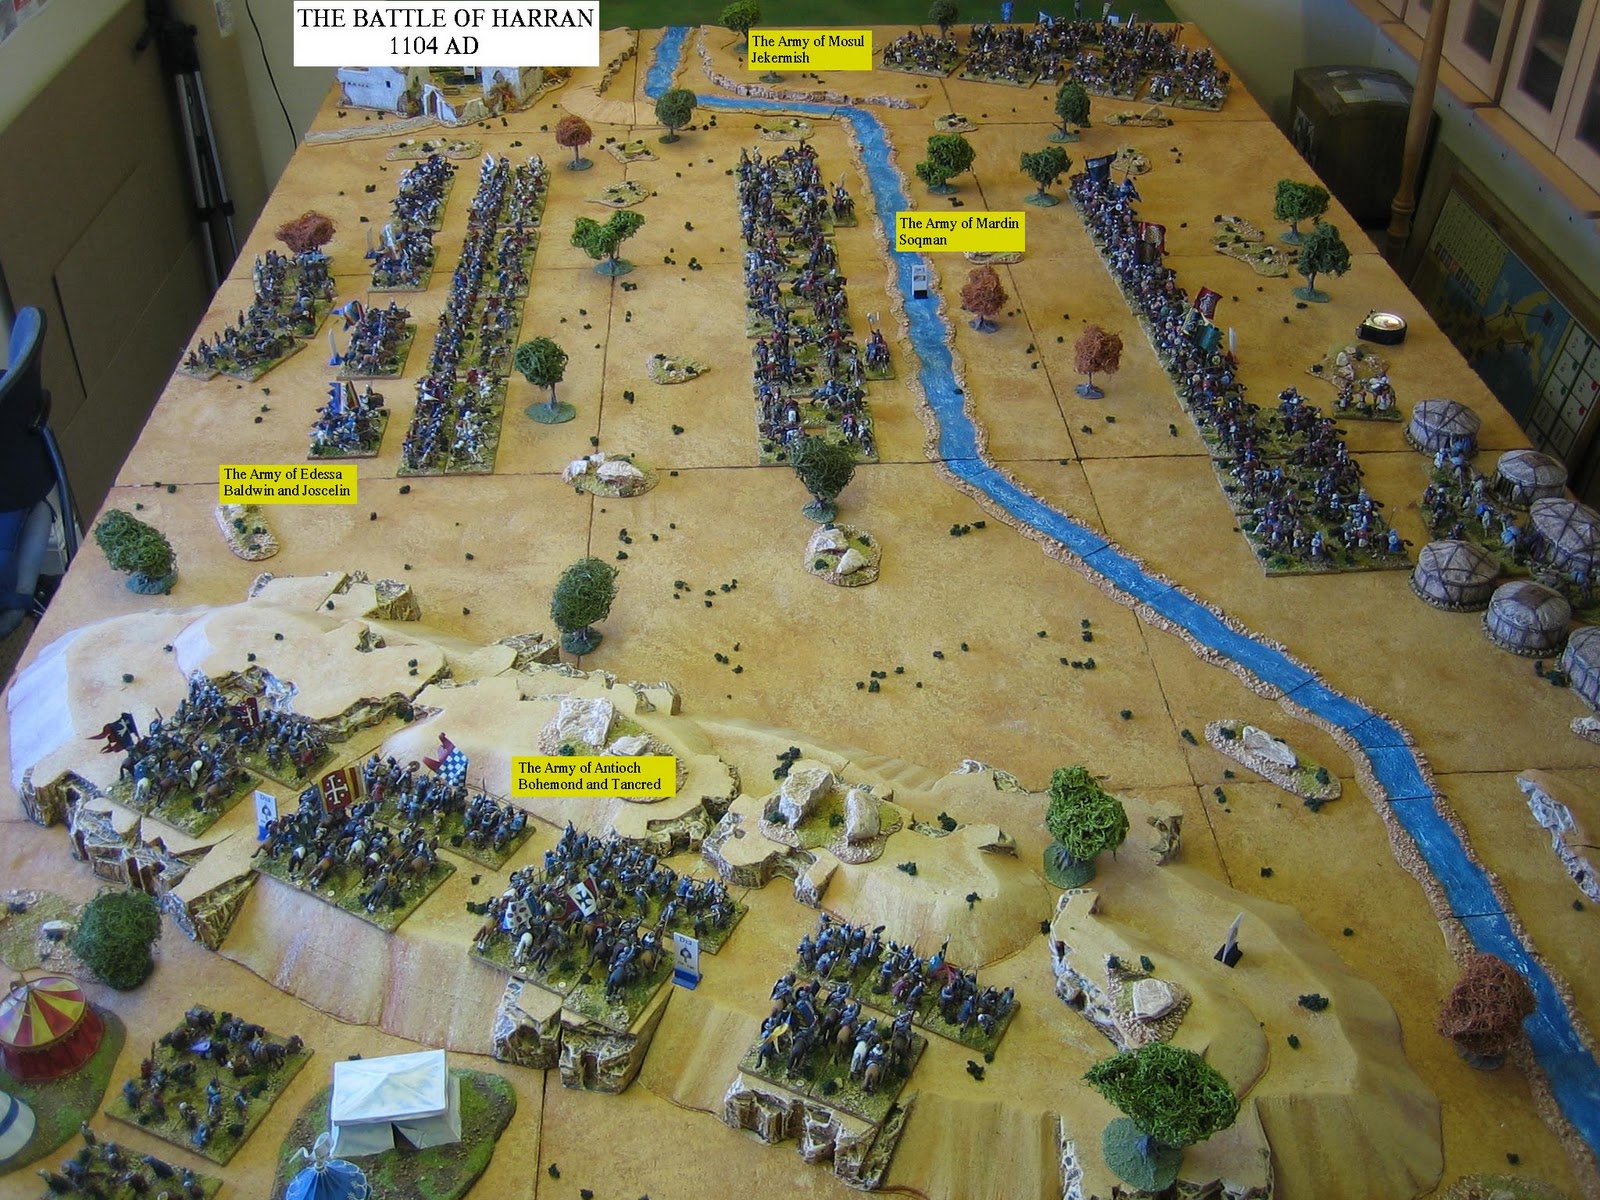
The battlefield was split north to south by the river Balikh. The river was fordable along its entire length, though the banks were muddy in places. To the south west (the Frankish side of the river) lay a large hill. All of the surrounding ground was gently undulating scrubland strewn with bushes and stunted trees; this did not hamper movement, but goes someway to explaining why visibility was hindered.
The Frankish plan of battle was cunningly simple. The Edessans would hold the open ground in the centre / centre left and draw the Saracen into a close quarter fight. Once the Saracen was entangled, the Antiochenes would emerge, from their ambush position, over the brow of the hill (right flank) and crush the Saracens from flank and rear.
The Moslem plan was somewhat similar. Firstly, Soqman’s Turcoman cavalry would engage with the enemy then feign flight back across the river. If the plan was successful the Franks would be drawn into pursuit and then crushed by fresh cavalry set in ambush on the Moslem side of the river.
As it was, the Saracen’s plan succeeded and the Frank’s plan failed. On seeing the Turcoman horse archers fleeing the Edessans thought the battle won and fell into pursuit. Once they had crossed the river thousands of fresh cavalry fell upon them from all sides and they were utterly destroyed and their leaders captured.
Bohemond’s Antiochenes did not even enter the fight. On cresting the brow of the hill, brushing away some light resistance as they did so, they saw the slaughter of the Edessans in the plain below; Bohemond ordered a retreat.
General Scenario Notes
I have devised this scenario to be played with Ager Sanguinis rules by James Roach published in Miniature Wargames in January 2009 issue 309 (with some later unpublished amendments, most of which come from the development of Ager Sanguinis Punic Wars to be published later this year).
The terrain and the forces should be deployed as per the deployment photograph. The forces of Jekermish and the Antiochenes (Bohemond and Tancred) are deemed to be ‘invisible’ to all other forces until they move, shoot, or are discovered. The Antiochenes will only be discovered if Soqman sends troops to reconnoiter from the hill’s summit. The troops from Mosul (Jekermish) will be discovered by the first Frankish unit to cross the river.
Edessa and Antioch
The combined strength of the two armies was put at more than 3,000 cavalry and 9,000 infantry, including many Armenian subjects from the Edessa region. By stripping every garrison of available men it represented almost the entire fighting strength of the northern Franks. For this battle, and using my own units, my figure ratio was roughly 1: 40.
Army Die: D10; Army characterization: 7 cards; D10 sequence deck with one Stratagem card.
Army of Eddessa

Baldwin (Motivation Die: D10): 1 small unit of Knights, 1 unit of turcopoles, 1 unit of Frankish sergeants, 1 unit of Armenian spearmen, 2 units of Armenian bowmen.
Joscelin (Motivation Die: D10): 2 small units of ‘Armenian’ Knights, 1 unit of Frankish sergeants, 1 unit of Armenian spearmen, 2 units of Armenian bowmen.
Army of Antioch

Tancred (Motivation Die: D12): 2 small units of Knights, 2 unit of Frankish sergeants.
The Antiochene ambush
Add a ‘Stratagem’ card to the army’s sequence deck: On the appearance of this card the Antiochenes, providing their position is not known to the enemy, can make a triple move as per ‘Move’ card counting it as ‘even’. For the remaining initiative pips in their phase, any enemy unit they contact may not evade, and, where required, any ‘Tactical Advantage’ cards can be used in place of a melee card for a single melee resolution. Its use represents a perfect ambush. Remove after use or the Antiochenes are discovered.
Mardin and Mosul
The best guess at Saracen numbers is 10,000, all of which were cavalry. I have seen certain accounts that break down this figure to 7,000 from Mardin and 3,000 from Mosul, but I have chosen to go with Steven Runciman (A History of the Crusades 2. The Kingdom of Jerusalem) who states “Soqman with a considerable force of Turcoman light cavalry and Jekermish with a slightly smaller force composed of Seldjuk, Turks, Kurds and Arabs.” In game terms this works much better. For this battle, and using my own units, my figure ratio is roughly 1: 40.
Army Die: D12; Army characterization: 6 cards; D10 sequence deck with two Stratagem cards:
The Army of Mardin
 Soqman (Motivation Die: D10): 2 units of Ghulam cavalry, 1 unit of Arab heavy cavalry, two units of Turcoman horse archers and 1 unit of Bedouin.
 2 Tribal leaders (Motivation Die: D10): Each with 3 units of Turcoman horse archers.
The Army of Mosul

Jekermish (Motivation Die: D10): 1 unit of Ghulam cavalry, 2 units of Arab / Kurdish heavy cavalry.
1 unnamed leader (Motivation Die: D10): 4 units of Seldjuk horse archers.
Turcoman feigned flight
To attempt feigned flight, one unit from each Turcoman command must move (up to 16”) to contact with a unit of each Edessan command. Roll D8 [Turcoman] Vs D10 [Edessan].
If the Turcoman roll is higher all Turcoman units immediately make a rout move towards, and possibly across, the river. The Edessan units become vexed and must pursue the enemy until they contact an enemy unit or they are rallied: Leaders not in pursuit rally with a Down 1 modifier; leaders in pursuit rally with a Down 2modifier. Turcoman horse archer units in feigned flight count as routed except that when rallying they do not count the down 2 routing modifier and they may be rallied by Soqman as well as their own tribal leader. Any unit in feigned flight that is contacted by the enemy is properly routed.
If the Turcoman roll is equal or lower the Turcoman unit becomes embroiled with its target and must remain in contact.
Figures
All figures (except for 24 ‘Arab’ foot archers by Renegade Miniatures) are Perry Miniatures from their First Crusade range. All figures were painted by James Roach of Olicana Painting Services using Humbrol enamels. All figures are based on 4mm ply wood. Infantry bases are 60mm x 60mm. Cavalry bases are 60mm x 90mm.
Terrain
The table is 10 feet by 6 feet. Terrain tiles are the reverse side of tiles by TSS painted with household emulsion (shades of Dulux Whole Meal Honey). Trees are by Last Valley. Hills are home made. They are constructed from high density polystyrene insulation board. All other terrain is scratch built.
The Ilkley Lads
The Ilkley Lads are an informal group of ‘40 and 50 somethings’ operating out of various private addresses in Ilkley West Yorkshire.