History in the making!


The world’s first 15mm - 1/100 scale, Injected plastic, science fiction model kit for tabletop gaming!

4.5" tall (114mm)

This kit has all the features and details of its big brother, fully poseable, featuring quick swap weapon arms for future releases.

This kit comes complete with advanced capacitor coolers and the Excalibur sword option!


This is not the same 15mm scale kit we made in resin, the resin kits were 5.5” tall and fixed pose. These will be 4.5” tall (a true conversion to 15mm scale) and fully poseable just like their big brother. If there is enough interest (backers) I can release all the weapon options you see for the 28mm kits in this scale and in this Kickstarter project!

Iron-Core is being fast tracked so you will have a game to use both the 15 and 28mm figures in. I would love to see the 15mm scale take off! Iron-Core is a vehicle centric game and 15mm is a better scale for that kind of game, as well as being kinder to the pocket book ;)

If you would like to see all eight factions ranging from gothic to hard sci-fi aesthetics made in plastic model kits, then I ask you to show your support. The more backers we have for the 15mm scale kits, the easier it becomes to justify quickly expanding that range.

 
Thank you for your help!

Another heavy weapon opens up!

One more stretch goal down, and the Nova Cannon will now be a plastic kit!

A very short break from campaigning

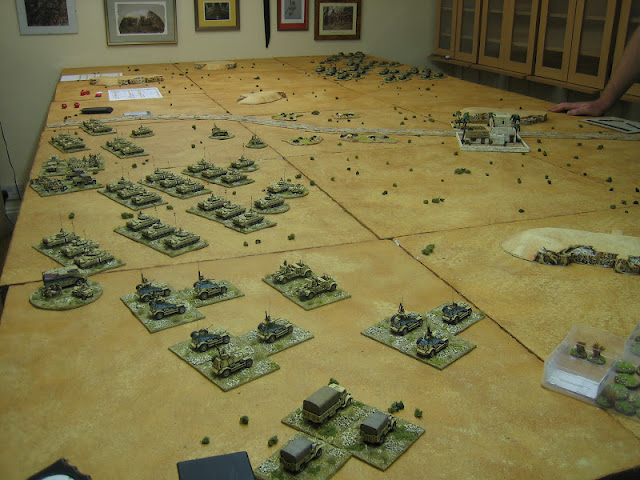
Just for a change, Peter and I decided to throw something a little more heavy than pilums at each other. During my vacation from war game projects I've been enjoying painting a little bit of this and a little bit of that. Recently, I've been painting some Afrika Korps stuff for Operation Crusader and I have managed to complete Battle Group Cramer of 15th Panzer Division (less one coy of 15cm howitzers). Having already completed 22nd Armoured Brigade Group of 7th Armoured Division, I suddenly realised I could put together a tank battle.

The rules, largely based on classic Piquet's "Point of Attack - The Blitzkrieg", are still very embryonic. They are being designed to be very period specific - in this case covering Operation Crusader / Siege of Tobruk 1941, and the Gazzala Battles 1942 during the Western Desert campaign. As they stand, there is enough to do the basics, and rest can be explored or fudged as situations arise.

One quite interesting idea we tried last night, is to use the table tile grid for terrain definition - the tiles with a small hill in them are areas where hull downs might be found. There are few proper hills in the Western Desert, but the ground is not dead flat. The small hills (I'll be making some smaller purpose made mounds) are just movable markers. At the end of a movement within such a square a unit of vehicles, or deployed guns, can attempt to go 'hull down' by rolling their 'Other Difficulty' dice Vs D8.  The German 'Other Difficulty' dice is D10 the British is D8. This dice is a catch all fall back used to decide odd situations not covered within the rules and includes the tactical nous of tank commanders. If a vehicle or gun finds a hull down it is marked with a cover marker which it can place to either front, flank, or rear (again, I'll be making some better markers than the 'dug-in' markers we used last night).

Anyway, the game worked fairly well, though it took some time to remember the differences between classic Piquet and Piquet, Field of Battle style. I took a few shot to commemorate the new units losing their cherry - or is that a bar mitzvah for the Germans?

The British win most of the initiative and attack.
The British seek the tactical advantage of 'rolling ground'.

The Germans bring up the heavy stuff.

This one stand unit (representing a battery of 4 guns) is absolutely lethal - in Piquet terms it's base fire dice is D12+1 even after taking account of the small numbers of guns - it's a real tank killer.
British Crusader tanks manage to find hull downs.
The virgins. 8th Panzer Regiment in wedges advancing, under fire, across open ground.

Two stretch goals down!


We are into some exciting stuff! The Beowulf/Grendel guns will now be plastic models and we have a large selection of goodies laid out in front of us ;)
 

13 Video Game Consoles, 3D Models now available


You can now buy the complete package with the 13 3D Models that I used for 'EmuStation 3D' from TurboSquid.com for only 8$!

The .zip package includes 13 Low-Poly 3D Models in .3ds and .obj format.
9 home consoles and 4 handheld consoles.
Every 3d model is low-poly with 100-200 polygons and comes with a 256x256 texture.

The models are:
- Atari 2600
- Game Boy
- Game Boy Color
- Game Boy Advance
- GameCube
- NES
- Nintendo DS
- SNES
- Nintendo 64
- Play Station
- Sega Dreamcast
- Sega Genesis
- Sega Master System

Click to view the 3D Models on TurboSquid.com

And the punches keep on coming!

The situation map after the Battle of Faleri 209 BC. During the next two years a lull ensued. During the lull both sides sought to gain advantage through diplomacy and sneaky tricks until.............

Rome: Card 57: Hannibal councils Carthage - No troops may leave Africa until after the next reshuffle. 

Carthage: Card 49: Hannibal moves to Paestium.

Rome: Card 21: Mercenaries desert - Hannibal loses 1 CU.


Carthage: Card 13: Hannibal recruits 2 CU in Bruttium.

Rome: Card 53: Nero moves to Rome.

Carthage: Card 36: Diplomacy in Spain - Rome no longer has possessions south of Idubeda.

Rome: Card 12: Assert political control over 2 areas.

Carthage: Card 12: Assert political control over 2 areas.

Rome: Card 43: Rome raises slave legions, promising freedom for service.

Carthage: Card 17: Assert political control over 1 area.

Rome: Card 7: Nero gathers the strength of Rome. He marches south and brings Hannibal to battle on a plain near Paestium.

Rome musters 12 CU, Carthage musters 9 CU.  

  The situation at the end of the map phase - Summer 207 BC. Rome, it would seem, is insistent that Hannibal should leave Italy.

Did someone ask for more Leviathan weapons?


Weapon Swaps for the Leviathan Crusader and Mortis

These are Kickstarter exclusives and not likely to be released until the variant that uses these weapons are made into complete model kits! If you want them, now is the time to get them, or you may be waiting a very long time for these optional weapons.


Restrictions: In order to add these optional arms you must pledge for at least one Leviathan Crusader or Mortis (If the Mortis stretch goal is reached).

These hot swap weapon arms will allow you to instantly customize your Crusader or Mortis, Twist and remove the current arm and slap on one of these beauties! The weapon arm kits will come complete with the armor plating you need for the Crusader (for both Left and right arms)  and you can simply leave the extra armor off for your Mortis kits.

*Some arms are right or left specific, so you will need to specify which arm, left or right hand version you would like when we send out the survey. But why not pledge for a matching set!


At $61,000, all contributors who funded a Leviathan kit may pledge an additional $25.00 for a Beowulf/Grendel cannon kit. With this kit you can build one of two variants; the massive Beowulf artillery gun or the powerful Grendel siege gun. You choose which suits you best. *This kit will come with everything you need for a single right or left handed version.

At $65,000, all contributors who funded a Leviathan kit may pledge an additional $25.00 for a Nova Cannon. A massive plasma gun that that turns heavy armor into slag.. *This kit will come with everything you need for a single right or left handed version.

At $70,000, all contributors who funded a Leviathan kit may pledge an additional $25.00 for a Ripper Saw. A monstrous whirling blade that turns fortifications into rubble. *This kit will come with everything you need for a right or left handed version.

At $75,000, all contributors who funded a Leviathan kit may pledge an additional $25.00 for a HEL Cannon. A High Energy Laser with unequaled armor penetration capability. *This kit will come with everything you need for a right or left handed version.

At $85,000, all contributors who funded a Leviathan kit may pledge an additional $25.00 for a Left Hand Mauler Claw. Grapple with other vehicles or let the pneumatic knuckles do your talking.  *This kit will come with everything you need for a Left handed version.

At $95,000, all contributors who funded a Leviathan kit may pledge an additional $25.00 for a Right Hand Mauler Claw. Grapple with other vehicles or let the pneumatic knuckles do your talking.  *This kit will come with everything you need for a Right handed version.

At $100,000, all contributors who funded a Leviathan kit may pledge an additional $25.00 for a Left or Right hand Vulkan cannon. *This kit is right or left hand specific, please note which arm, Left or Right you needed.


If you like what you have seen, please help me get the word out, blog posts, forum posts, Facebook... every post helps!


Weekly Progress and Anpo Starters

Want to get the Shiny legendary dogs? Shiny Mew? or any other shiny pokemon in the game? Adopt them today using SnD coins! Click here for more info.
Visit the PTD: Pokemon Center - a place to trade pokemon, get your Daily Code, adopt Pokemon, view your items and change your avatar!


Hey guys and gals! Welcome to another week of Sam and Dan Games. This week we have some sneak peak at the Creature Universe Starters and the weekly progress for what will be new in Pokemon Tower Defense 2 this week. Enjoy!

Creature Universe (aka ANPO) Starters:
Okay so every creature game should start with the trainers getting their first creature. In pokemon you started in one town and you picked from three different starters. In most games in the series you could pick from a grass, fire or water pokemon. My first thoughts in designing ANPO were "okay why not have different types available? Why not have all types available?" I thought it would be great if you wanted a specific type to be your starting type. Why only have 3 choices? Then I said "wouldn't it be cool if each starter had a different starting location?" What if since each city specializes in a certain type why not have a starter on each city and have players decide which city they wanted to start from. That all sounded great! But then I came back to earth and thought about how many different types we might have and about how long it would take to make all those cities right from the start. Okay so I like the idea of different cities for each starter. I like the idea of letting you choose which type you want to start. But to release the game I have to limit how many starters I will release the game with. So let's go back down to 3 and then as the game progresses we will add more. Okay so 3 starter types for 3 cities. The starters will be like that cities mascot. They will be an important part of that city. That is the creature that young trainers from that city receive when they first start training.

Now which 3 types should it start with? My first thoughts were to not do fire, grass, and water. Let's make it different! WOOOO! How about flying, ground, electric? Hmm it doesn't quite work out... Flying isn't super effective against ground... Also it's not that intuitive to figure out who beats who... not as nice as fire, grass, and water. So I decided okay I want more than 3 types for starters but if I only have 3 types then they will be fire, grass, and water. So a few weeks back I had my artist, Kevin, Bill, Evan, Josh and Joel, start coming up with concepts for creatures for ANPO. We have over 100 designs already! But I like to present to you the work in progress sketches of the water, fire, and grass starters for ANPO!
Work In Progress ANPO Starters
Weekly Progress:
This week for PTD 2 will we have another 1v1 level, this level should be enough for kakuna and metapod to level up to 10 so I will include the unlocks for those. Also I'll be pushing for saving in the story mode and the second quest where you can actually pick your starter. Plus if I have time during the week I'll add any small fixes or changes that I find.

Alpha v1.14 Added the Girl Avatar for story mode, saving for story mode, Bug Fixes and Changes (9/2/12): Released!
  • Fixed a bug that was making attacks that should do at least 1 damage do 0 damage - Like Poison Sting on Geodude
  • Fixed a bug that prevented a pokemon from learning an attack when it evolves and you beat a level
  • Fixed a bug with attacks with an initial cooldown having a cooldown glitch
  • Removed Prof Oak's winning text and added different text in Story Level 1
  • Added Johto Starter sounds to the Story Level 1 Intro
  • Added the correct lost popup to Story Level 1
  • Implemented the girl avatar in story mode
  • Fixed being able to enter houses through windows and walls in Story mode 
  • Lowered the Geodude's level in Level 6 of 1v1 to 10, 11, 12 respectively, also lowered the amount of buffs they do before attacking
  • Gave Professor Oak the correct questions to ask the player on Story Level 1 Intro
  • Fixed a bug with beating a level while playing at a higher speed
  • Added properly deleting profiles when the delete button is pressed  
  • Added saving your story profile
Alpha v1.13 New Level, Bug Fixes and Changes (8/28/12): Released!
  • 1v1 Level 6
    • Intro
    • Level Layout
    • Waves
    • Ending
  • Added Butterfree and Beedrill as unlockables
  • Lower the effect of speed changes to attack speed
  • Update speed changes to attack cooldown in real time instead of only when a new move is going to be done
 That's all I have for you this week, keep checking back to see how I am progressing on the update, and let me know what you think of the starters and the weekly progress in the comments below or on twitter.
Thanks!

Eisenkern Support Weapons Set; now available in Plastic!


And yet another goal is met! The Support Weapons Set will now be a plastic model!

 
Congrats to all and a big thank you to everyone who made this possible.

Something for dessert - how I paint WW2 vehicles for N. Africa

I have found painting 15mm WW2 vehicles for the desert theatre quite relaxing and a complete change from 28mm figures. Recently, I was asked how I did it. I'd been planning on doing a "how I" for some time so I got the camera out whilst putting together my German reconnaissance battalion.

Before I start, and to prevent a pointless waste of peoples time posting corrective comments, I wish to explain the organisation of this formation. As most of you will know I have chosen to recreate my formations at a figure scale of approximately 1:5, and this being the case I will have to fudge and change some organisational details; none more so than for this formation. Instead of the usual company level unit organisation I have chosen to field the armoured car company in small 'battle groups' combining other battalion assets. There should be 4 armoured car groups based around the four A/C platoons in the battalion, each with attached motorcyclists, but this would be hard to scale into three stands per 'battle group' without making the overall battalion too powerful - so I have done only three. There should also be less SdKfz 231 armoured cars but I wanted a distinguishable 'heavy' unit. The battalion's support company weapons (a 7.5cm infantry gun and a PaK36) will be split up and added to a battle group for a 'combat adjustment'. Purists will want to hang me, but they will have to find me first.

Except for some gun crew, this is what the battalion will look like. 
This is how I got there.....

 
Step 1: Preparation.

i]. Build the models using super glue.
ii]. Add radio antenna where appropriate using a fine drill, plastic brush bristles and super glue.
iii]. Stick vehicles to painting bases using small amounts of UHU and vehicles to ice lolly sticks with a glue gun.


Step 2: Undercoat
Normally I would undercoat using black spray paint, but to get a better variation in 'base' colour I'm undercoating manually using 2 coats of Humbrol enamel, in this case number 225.


Step 3: Ink wash
All vehicles are given a good coating of acrylic ink. This is Liquitex transparent burnt umber.

Step 4: Dry brush
Everything gets dry brushed with enamel. This is Humbrol number 93. This gives the basic 'used' look by varying the shade of what is, to all intents and purposes, the base colour. 


Step 5: First highlight
Using the dry brush colour (H 93) the first highlight is applied by over painting most of the dry brushed areas, but obviously staying away from darkly shaded areas. The first picture shows two SdKfz 231s, the one in the foreground has been highlighted. 


Step 6: Ink detail
My next step is to go back over very deep shadow and around model detail, such as hatches, by painting with burnt umber ink. Ink flows extremely well so this job is easily accomplished with a fine brush.


Step 7: Second highlight
This is simply a case of going over most of the first highlight with a lighter shade (I used H 94). It is the time to tidy the edges and lessen the thickness of the ink lines - painting to a line is easier than pianting one.


Step 8 & 9: Last highlight and black
i]. The last highlight is applied with a brush, paying special attention to the 'corners' where two plates meet. I used H 94 mixed with H 34 (white) for this.
ii]. I paint everything that needs to be black with H33 then highlight with a grey colour.


Step 10: Bits and pieces
This is part of the finishing touches and includes adding metal tones to MGs and tracks, and painting luggage, tilts and the like using a basic three tone highlight technique.

Stage 11: Vehicle crew
Lastly I paint any human beings using various shades, and generally using a three tone highlight.

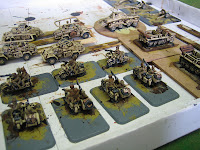
Some close ups of it all finished


That's it and I hope this might be of use to someone. It is a time consuming method that requires some skill, but I think the effort is worth it. It works very well for identifying these small vehicles and figures from war game distances.

Why do I bother....

David over at DWARTIST is at it again.

Makes me wonder why I ever bother to pick up a paintbrush :)

He just started painting up one of the Eisenkern Kreigsmarine.


He is forever painting up something new and interesting.... go give his blog a look and see what I am taking about.

Kickstarter Exclusive!

Wai Kee Hui, the owner of WGF and manufacturer, is as excited about this project as I am. He has graciously offered to produce a Kickstarter special item as a way to say thank you to the supporters. All backers at the $20.00 level or above will receive an exclusive 28mm figure of a Feral Shadokesh and Handler.

 
The Shadokesh are the mortal enemies of the Eisenkern faction. The first human contact with the Shadokesh was made by a delegation from Eisenkern. The Shadokesh met with the human delegation, studied them and when they were satisfied they were of no use to the Shadokesh Empire they were violently dispatched. The Dhar-Hazier were given a similar reception over seven hundred years before. The outcome was quite different, the Shadokesh were forced to re-evaluate the danger this race may pose to the Shadokesh Empire. The Dhar-Hazier have now been at war with the Shadokesh for 753 years.

Something Wicked This Way Comes!

Thanks to all of you, this project is now funded!


The  Leviathan Crusader and Stormtroopers will be produced in plastic!


THANK YOU!


What's next?

Well, I have lots of stretch rewards and some you have not yet seen..... I would like to thank all of you for helping a little indi company step into the big world of plastic miniatures!

40K Stretch Goal (FREE TO OUR BACKERS)


45K Stretch Goal (FREE TO OUR BACKERS)


50K Stretch Goal


60K Stretch Goal

80K Stretch Goal

90K Stretch Goal

100K Stretch Goal


Search This Blog

Popular Posts

Blog Archive